Wednesday, December 2, 2009

There's an In-N-Out in Death Valley, right?

My Dad is running in the Death Valley Marathon on Saturday, so I'm off to California to cheer him on/eat an In-N-Out Burger. I'll be on blog hiatus for a bit.

This isn't Death Valley, but it's a National Park, so the picture is relevant. Even though Death Valley is mostly desert. RELEVANT. I swear.

World's Best Scones

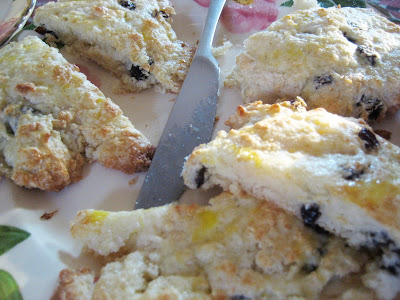
A while back I wanted to make scones for afternoon tea, and I typed "World's Best Scones," into Google. I clicked on the first recipe that came up and it had potential, so I tried it. These really are the World's Best Scones. Incredibly easy to make, ready quickly, and really really yummy.

World's Best Scones
Yields 8

  • 1 3/4 cups all-purpose flour
  • 4 teaspoons baking powder
  • 1/4 cup white sugar
  • 1/8 teaspoon salt
  • 5 tablespoons unsalted butter
  • 1/2 cup dried currants or raisins
  • 1/2 cup milk
  • 1/4 cup sour cream
  • 1 egg
  • 1 tablespoon milk

Preheat oven to 400 degrees.

Sift the flour, baking powder, sugar and salt into a large bowl.

Cut in butter using a pastry blender or rubbing between your fingers until it is in pea sized lumps (I used a cheese grater.) Stir in the currants or raisins.

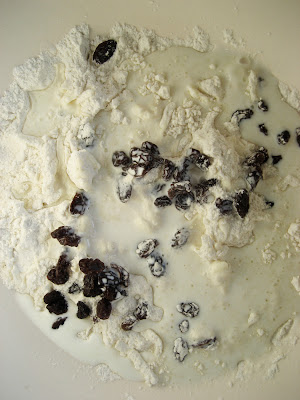
Mix together 1/2 cup milk and sour cream in a measuring cup. Pour all at once into the dry ingredients, and stir gently until well blended. Overworking the dough makes for bad scones.

With floured hands, pat dough into balls 2 to 3 inches across. Place onto a greased baking sheet, and flatten lightly. Whisk together the egg and 1 tablespoon of milk. Brush the tops of the scones with the egg wash. Let them rest for about 10 minutes (I ignored this because I was hungry and popped them in the oven.)

Bake for 10 to 15 minutes, until the tops are golden brown, not deep brown. Break each scone apart, or slice in half. Serve with butter or jam.

Original recipe here

Homemade Peppermint Patties

My favorite candies are Milk Duds, sour gummy worms, and York Peppermint Patties. When I saw a recipe for homemade peppermint patties, what choice did I have but to try it? (it's probably only a matter of time before I attempt to make homemade Milk Duds...) Making these is not easy. Or rather, it's not easy to make these aesthetically pleasing. Maybe my problem was I could only find milk chocolate dipping chips, instead of dark chocolate. However, these taste GREAT, nearly better than the original. They made my teeth hurt because they were so sweet, but it was worth it. Unfortunately this is another instance where I forgot to take photos and barely captured two photos on my phone as an afterthought. Whoops.

Peppermint Patties
Original recipe here at NoshwithMe.com

  • 3/4 cup sweetened condensed milk
  • 1 1/2 teaspoons peppermint extract
  • 3 1/2 cups confectioners' sugar
  • 3 cups semisweet chips or dipping chocolate (harder to find than I expected)
  • 2 teaspoons shortening, if not using dipping chocolate

In a large mixing bowl, combine condensed milk and peppermint extract. Beat in enough confectioners' sugar, a little at a time, to form a stiff dough that is no longer sticky. Form into 1 inch balls, then place on waxed paper and flatten with your palm or the side of your fist to form patties. Let patties dry at room temperature for two hours, turning once

In a double boiler over low heat, melt chocolate (with shortening, if not using dipping chocolate,) stirring often. Brush chocolate onto patties with pastry brush. Let cool on waxed paper until set.

Baked Doughnuts

I knew I wanted to make doughnuts while I was home for Thanksgiving and had access to my parent’s kitchen and, maybe more importantly, my Mom’s stand mixer. I also needed to be sure I had enough people around to actually eat the doughnuts, and my family kindly obliged. I much prefer the lighter taste and texture of these to fried doughnuts, and they could almost be healthy…. ? Or not.

Baked Doughnuts

Original recipe here at 101Cookbooks

Don’t over bake these, if anything, under bake them a bit – they continue baking outside the oven for a few minutes. You want an interior that is moist and not dry. Also, be sure to cut big enough holes in the center of your doughnuts, too small and they will bake shut. Remember they rise when they’re baking.

Yields about 1 1/2-2 dozen medium donuts, and the equivalent number of doughnut holes

  • 1 1/3 cups warm milk, 95 to 105 degrees (divided)
  • 1 packet active dry yeast
  • 2 tablespoons butter
  • 2/3 cup sugar
  • 2 eggs
  • 5 cups all-purpose flour
  • A pinch or two of nutmeg
  • 1 teaspoon fine grain sea salt
  • Various sizes of circular cookie cutters
  • An electric (stand) mixer

  • 1/2 cup unsalted butter, melted
  • 1 1/2 cups sugar
  • 1 tablespoon cinnamon

Place 1/3 cup of the warm milk in the bowl of an electric mixer. Stir in the yeast and set aside for five minutes or so. Be sure your milk isn’t too hot or it will kill the yeast. Stir the butter and sugar in to the remaining cup of warm milk and add it to the yeast mixture. With a fork, stir in the eggs, flour, nutmeg, and salt – just until the flour is incorporated. With the dough hook attachment of a mixer beat the dough for a few minutes at medium speed.

If the dough is overly sticky, add flour a few tablespoons at a time. Too dry, add more milk a bit at a time. You want the dough to pull away from the sides of the mixing bowl and eventually become supple and smooth. Knead a few times and shape into a ball.

Transfer the dough to a buttered or oiled bowl, cover, and put in a warm place. Let rise for an hour or so until the dough has roughly doubled in size.

Punch down the dough and roll it out until ½ inch thick on a floured countertop.

Use a 2-3 inch cookie cutter to stamp out circles. Transfer the circles to a parchment-lined baking sheet and stamp out smaller inner circles using a smaller cutter. If you cut the inner holes any earlier, they become distorted when you attempt to move them. Cover with a clean cloth and let rise for another 45 minutes.

Bake in a 375 degree oven until the bottoms are just golden, 8-10 minutes – start checking around 8. While the doughnuts are baking, place the butter in a medium bowl. Place the sugar and cinnamon in a separate bowl.

Remove the doughnuts from the oven and let cool for a minute. Dip each one in the melted butter and quickly toss in the sugar bowl. These are meant to be eaten immediately, while still warm (they do not hold up well.) Eating them quickly was not a problem…

World Peace Cookies

These cookies are really, really addictive. Not entirely unlike the chocolate wafers I previously posted about, they have a great dark chocolatey taste and crumbly texture. Sorry about the lack of photos, I was nearly done making the dough when I remembered to take a photo with my phone – my pint-sized nieces and nephews were in town for Thanksgiving and things were hectic. When the cookies were done they were promptly eaten, so I never managed to get a picture of the finished product, as I was too busy eating it. Check out the amazing smittenkitchen.com (where I discovered this fantastic recipe) for much better photos.

World Peace Cookies

Recipe found here at smittenkitchen.com. Originally from Paris Sweets, Dorie Greenspan

  • 1 1/4 cups all-purpose flour
  • 1/3 cup unsweetened cocoa powder
  • 1/2 teaspoon baking soda
  • 1 stick plus 3 tablespoons unsalted butter, room temp
  • 2/3 cup packed light brown sugar
  • 1/4 cup sugar
  • 1/2 teaspoon fine sea salt
  • 1 (or 2) teaspoons vanilla extract
  • 5 ounces bittersweet chocolate, chopped into chips


Sift the flour, cocoa and baking soda together.

Working with a stand mixer, preferably fitted with a paddle attachment or a hand mixer in a large bowl, beat the butter on medium speed until soft and cremy. Add both sugars, the salt and vanilla extract and beat for 2 minutes more.

Turn off the mixer. Pour in the flour, put a kitchen towel over the stand mixer to protect yourself from flying flour (I messed up on this and ended up covered in it), pulse the mixer at low speed about 5 times, a second or two each time. If there is still a lot of flour on the surface of the dough, pulse a couple more times. Continuing at low speed, mix for 30-60 seconds more, just until the flour disappears into the dough – work the dough as little as possible, it will look crumbly (which is good). Add chocolate pieces and mix only to incorporate.

Take half the dough and shape it into logs that are 1 ½ inches in diameter. Do the same with the other half. Wrap the logs in plastic wrap and refrigerate for at least 3 hours.

Center a rack in the oven and preheat the oven to 325. Line two baking sheets with parchment or baking mats (baking mats are on my Christmas list!)

Working with a sharp thin knife, slice the logs into rounds that are ½ inch thick. Arrange the rounds on the baking sheets, leaving about one inch between them.

Bake the cookies one sheet at a time for 12 minutes – they won’t look done, nor will they be firm, but that’s the way they should be. Transfer the baking sheet to a cooling rack and let the cookies rest until they are just warm, then serve. Cookies are also more than edible at room temp. Store uneaten cookies in airtight containers.